Quest: Tailor Visual Studio Codespaces To My Needs
In the past few days, I have started playing around with Azure's official release of Visual Studio Codespaces. If you are not familiar with what the product is, it is a cloud-hosted development environment that offers 3 different environment configurations that cost $0.085, $0.169, and $0.339 per hour while "active". When the environment goes it to a "suspended" state it just costs $0.0088 per hour. With how cost-effective this can be to spin up a development sandbox I wanted to give this a spin for future collaborative work and my Twitch Streams.
Creating an environment is super easy once you have an Azure account setup. Just visit https://online.visualstudio.com/ and click the nice big "Get started" in the center of the screen to be brought into the dashboard. From here you will need to create a plan which is a couple of easy steps and afterward, you're on your way to making your own cloud development environment.
At this point, I just selected the "basic" instance type, created my Codespace, and load into the development environment.
Now Codespaces comes with loads of stuff already preloaded in the environment. Here is a list of all the good stuff it comes with so you can just code:
- Python
- Node.js
- .NET Core
- PHP
- Java
- sudo
- fish
- zsh
- Powershell
- Azure CLI
- Docker
- Kubectl - Must be configured before first use
- nvm
- nvs
Additionally, I found that Yarn is also included.
Ok, so this is awesome, so much stuff! BUT, I am a Rails developer, Ruby isn't installed ☹️. Also, recently have been doing learning Elixir streams on the CodingZeal Twitch Channel and if I spin up a new developer sandbox it would be super annoying to install all these dependencies over and over. So I set on a quest to make my life easier and anytime I spin up a development environment it will have the bare minimum I need to get started.
Researching The Quest Objective
When prepping for my quest to customize any and all Codepsaces to suit my needs on startup I found two ways.
- Codespace environments are fully customizable on a per-project basis
- Personalize Visual Studio Online with dotfiles
Number one doesn't work out in my use case. It's a really cool setup with creating a devcontainer.json file that has all the configurations you want your environment to have. But the downside is that this file needs to exist in a project. That means cloning a project into our new Codespace which is not something I want to do if I want to spin up an environment on the fly.
Number two is a much better solution since you can use a dotfile to configure your Codespace when it's being built. A dotfile is just a bash script that runs with a bunch of commands to run in your environment as you would normally do manually. For instance, installing RVM on your new laptop so you can manage your Ruby versions. So let's go with using a dotfile to customize my Codespaces.
Tailoring Codespaces with Dotfiles
I dont know about you but when I read Dotfiles in the documentation I thought of some massively difficult sort of scripting files that configure your environment. Lucky for us that is not the case. As mentioned in the previous section, they are just scripts to run. If this knowledge in hand I began my quest to customize my Codespace by researching how to build my dotfile.
I began thinking about the equipment I want when slicing and dicing code in my Codespace environment to make my life easier. Here is the list I came up with to cover all my bases:
- RVM - Ruby Version Manager so I can install any version of Ruby a project I am working on might need
- Add my Vim configuration
- Install tmux & my tmux configuration
- Install tmux plugin manager
- Install kiex - Like RVM but for Elixir
- Install latest Elixir
- Install Hex - Package manager for Elixir,
- Install Phoenix Framework
- Install any other system package I might need for Ruby on Rails
Now that I know what I need to have the bare minimum working environment. I started finding out all the proper bash commands I need to run to get it all installed in a Linux environment.
Creating The Dotfile
To make working with Visual Studio Codespaces and seamless as possible you should create a brand new Github repository that will house your dotfile. For me, I already happened to have a repository that houses information on my personal development setup so I just used that. https://github.com/talk2MeGooseman/tools-and-workflow-stuff
- Create your Github repository
- Next, create a file called bootsrap.sh The file name is very important, I'll try to explain it later.
- Open it up and time to edit
The route I took for figuring out what to put in my dotfile was just to look up the installation steps for all my "equipment" on their respective Github repository or websites. To get started the most important like in your bootsrap.sh file will be #!/bin/bash. Everyone after that is what you desire. Below is what my script looks like. You can get a really good idea of how to install stuff based on what I have done in my file.
#!/bin/bash

if
  [[ "${USER:-}" == "root" ]]
then
  echo "This script works only with normal user, it wont work with root, please log in as normal user and try again." >&2
  exit 1
fi

set -e

echo "Updates packages. Asks for your password."
sudo apt-get update -y

echo "Installs packages. Give your password when asked."
sudo apt-get --ignore-missing install build-essential git-core curl openssl libssl-dev libcurl4-openssl-dev zlib1g zlib1g-dev libreadline6-dev libyaml-dev libsqlite3-dev libsqlite3-0 sqlite3 libxml2-dev libxslt1-dev libffi-dev software-properties-common libgdm-dev libncurses5-dev automake autoconf libtool bison postgresql postgresql-contrib libpq-dev pgadmin3 libc6-dev tmux -y

echo "Installs ImageMagick for image processing"
sudo apt-get install imagemagick --fix-missing -y

echo "Installs RVM (Ruby Version Manager) for handling Ruby installation"
# Retrieve the GPG key.
curl -sSL https://rvm.io/mpapis.asc | gpg --import -
curl -sSL https://rvm.io/pkuczynski.asc | gpg --import -
curl -sSL https://get.rvm.io | bash -s stable
source ~/.rvm/scripts/rvm

echo "gem: --no-ri --no-rdoc" > ~/.gemrc

echo "Installing kiex - Elixir Version Manager"
curl -sSL https://raw.githubusercontent.com/taylor/kiex/master/install | bash -s stable
echo '[[ -s "$HOME/.kiex/scripts/kiex" ]] && source "$HOME/.kiex/scripts/kiex"' >> ~/.bashrc

echo "Fetching Erlang & Elixir Deps"
wget https://packages.erlang-solutions.com/erlang-solutions_2.0_all.deb && sudo dpkg -i erlang-solutions_2.0_all.deb
sudo apt-get update -y
rm -fr erlang-solutions*

echo "Install Erlang"
sudo apt-get install esl-erlang -y

echo "Install Elixir"
sudo apt-get install elixir -y

echo "Install Hex, Elixir package manager"
mix local.hex --force

echo "Install Phoenix application generator"
mix archive.install hex phx_new --force

echo "Add Tak2MeGooseman's tmux conf"
wget https://raw.githubusercontent.com/talk2MeGooseman/tools-and-workflow-stuff/master/.tmux.conf
mv .tmux.conf ~/

echo "Install TPM, Tmux Plugin Manager"
git clone https://github.com/tmux-plugins/tpm ~/.tmux/plugins/tpm

echo "Add Talk2MeGooseman's .vimrc"
wget https://raw.githubusercontent.com/talk2MeGooseman/tools-and-workflow-stuff/master/.vimrc
mv .vimrc ~/

exec /bin/bash --login
If you skimmed my bootsrap.shfile you will see a mixture of apt-get commands, curl commands to run installation scripts from the library I want to use, and wget commands to download things directly from Github. Do whatever you want here to make sure you have your Codespaces set up just the way you like.
Completing The Quest To Tailor Codespaces
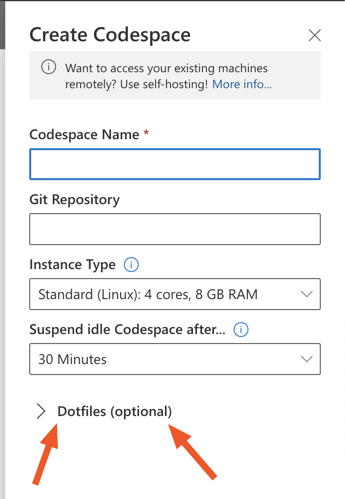
Once you have your bootstrap.sh created and saved inside your new Github repository, it's time to use it! Now when creating a Codespace inside the Visual Studio Codespace we're going to tell it to use our new script when setting up the environment. Inside the panel to "Create Codespace" there is a section called "Dotfiles Optional", open up that section.
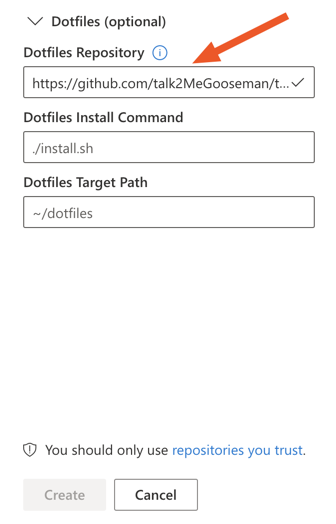
Once open, inside of "Dotfiles Repository" put in the URL to your GitHub repository that contains your bootsrap.sh file. Now just click "Create" and you're done.
Quest Completed
BOOM! Now you have a tailored Codespace environment to suit your needs. But I didn't put any other information like the install command? You might ask. Well, the nice thing about Codespaces, when you give it your Repository URL, it will try and find the following files and run them:
install.shinstallbootstrap.shbootstrapsetup.shsetup
Codespaces is a really cool product and so far I have been enjoying and hope you find this useful and customize Codespaces to your liking.
Comments
Join the discussionNo comments yet. Be the first to comment.


